


The harness is all you need (mostly)

If you’re feeling overwhelmed by AI right now, you’re not alone.
Every day it seems there is a new tool, new MCP, new model, new skill, new workflow, new feature, new social post that is some form of “Hey look! I have completely figured out AI with this one weird prompt.”
I…don’t believe you.
I work with AI every single day, and what I’m finding is that less is way more. It’s not about what I install or configure or trick the agent into doing that makes any real difference. That stuff is interesting, but at the end of the day it feels like gimmicks.
I see the biggest gains in my productivity from how I use the harness and how well I understand it.
So in this post, I’m sharing you a simple workflow that you can use to drastically improve your effectiveness with AI just by using existing features of GitHub Copilot. No weird prompts. No skill everyone else seems to know about. Just the harness. The harness is all you need—mostly.
1. Pick a tool, any tool
This is an obvious one, right? Pick a tool! It’s so easy!
But even within the GitHub Copilot family, there are a lot of options. These include the CLI, the new GitHub Copilot app, VS Code, Visual Studio, and JetBrains, just to name a few.
The good news is that these experiences are increasingly being centralized on the same harness. The details can differ by tool, but the core workflow is consistent. Learn the harness once, use it everywhere.
That said, I do believe that learning the harness is key, and the best way to learn it is to be as close to it as possible. So if you are just starting out, I’d recommend beginning with the GitHub Copilot CLI. It’s a terminal interface, which means it’s just text. There isn’t much UI to learn. You enter a prompt. The agent does things. But the interaction is more direct, immediate, and, frankly, very satisfying.
For this demonstration, I’ll be using the new GitHub Copilot app. But the harness that app uses is the exact same thing you’ll be using if you are using the GitHub Copilot CLI, Visual Studio Code and many other places you can find GitHub Copilot.
2. Turn on YOLO mode
YOLO mode is also known as “Allow All.” This lets the agent execute any command without asking permission. This can vary depending on the tool you are using, but for most it is simply an /allow-all command in the chat. Otherwise, the agent is going to stop and wait for your approval every single time it needs to do some work.
Agents need autonomy for you to see an increase in productivity. If you have to approve everything the agent does, you might as well just do it yourself. Besides, that’s a miserable user experience. Nobody wants to be relegated to sitting at a desk pressing the “Approve” button all day. And pressing “Approve” over and over just trains you not to read what you are being asked to approve, which defeats the purpose.
You want to be safe with agents, though. Bad things happen to good people. When using YOLO mode, you don’t want to run the agent on your local machine. This is especially true when you are using them at work—data is private on your organization’s systems, and mistakes can be costly.
Fortunately there are a bunch of options for running agents in sandboxes. An easy one to get started with is GitHub Codespaces or development containers.
3. Start with a prototype
One of the most magical things about AI is that you can easily prototype anything and everything up front. Historically, this was not the case. Prototyping was a full phase of a project, and were often a luxury. Now, you can make one with a prompt.
Let’s look at a few examples.
Let’s say we want to build a date picker web component. That seems straighforward, but it’s actually quite complex. Think of all the different things you might want to do with it.
- How do you navigate within the component?
- What does the selected date look like?
- What does a selected range look like?
- How does the user navigate between days, months, and years?
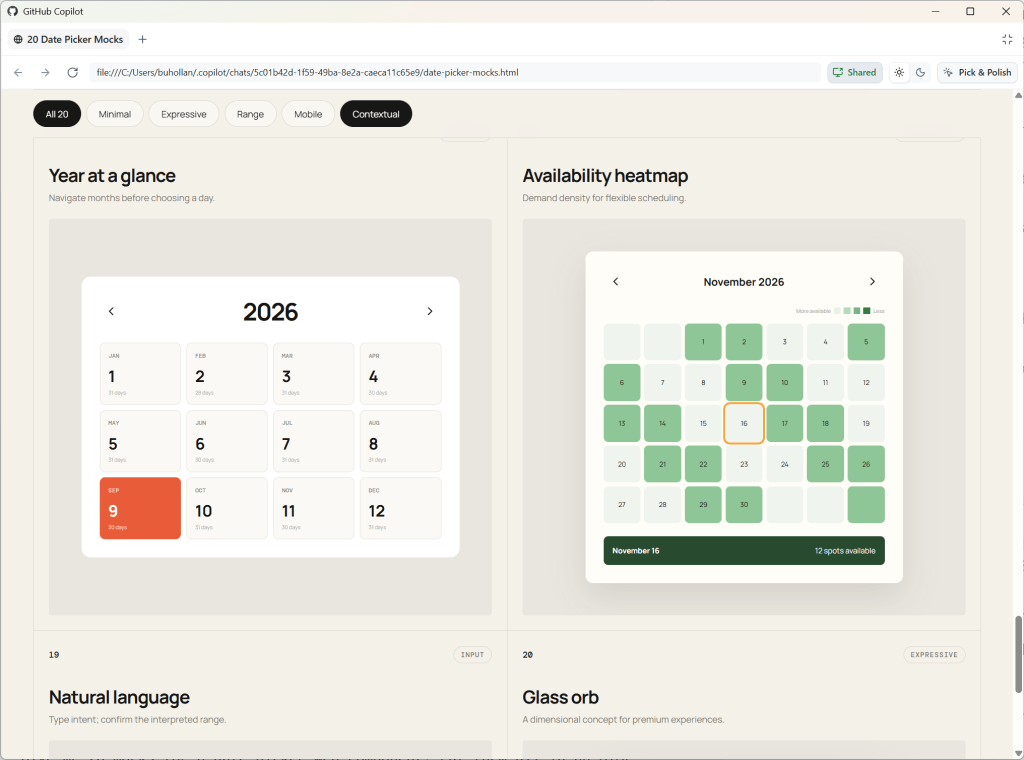
Start with a simple prototype and get several variations. I usually start with something like this:
In this case, the AI generated a bunch of different layouts, but one of them is a mock where it starts with the year view. That’s interesting. I would like my date picker to enable the user to zoom out to the year, then into the month, and finally to the day. These are the kinds of things you don’t consider until you see them.
As humans, we process sensory-rich models like images, shapes, and tangible layouts much faster than dense text. Creating low-effort prototypes early on helps make complex concepts immediately intuitive.
And this applies to non-visual tasks as well.
For instance, if I want to add a new API endpoint, I’ll still create a visual prototype to understand the requirements and constraints before diving into the implementation.
Create a visual mockup of the API for this project. Add five options for how we could handle a new API endpoint that allows the user to download their analytics data.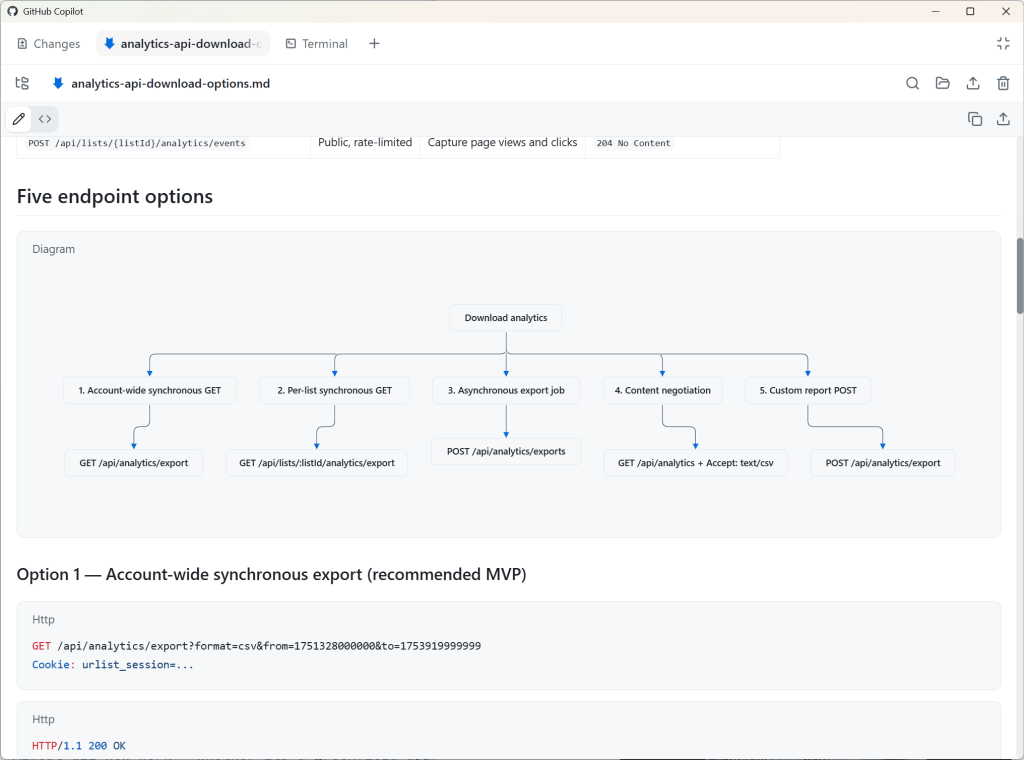
Since the GitHub Copilot app supports Mermaid diagrams, the agent renders this as Markdown, mapping out five different ways we could implement this API endpoint.
When working with agents, it’s easy to forget that everything is nuanced. Prototyping helps uncover the nuances up front, so you avoid spending valuable time and tokens on rework.
I recommend using a medium-sized model, such as GPT 5.6 Terra or Claude Sonnet, on medium reasoning for most work. I also recommend you stick with whatever model you choose here for the duration of this particular feature, bug, or enhancement. Prompt caching will save you tokens. As long as you don’t switch to a different model or reasoning level, your previous chats remain cached with the model, giving you a discount on future requests.
4. Plan methodically
Now that you know what you actually want versus what you initially thought you wanted, it’s time to plan out the implementation.
Switch to plan mode in GitHub Copilot without starting a new session.
“/plan Build a date picker web component. I want the user to be able to zoom in and out of years, months, and days.”
That’s a pretty vague prompt, and you’ll likely have more context for the model than I do here, but this is just a demonstration. If you don’t have more context, it’s OK. That’s exactly what this step is for.
In theory, you can get a model to one-shot anything if you compose the perfect prompt with the perfect context in the perfect order. In theory.
But none of us can do that. Planning helps you get closer to that ideal, though, by asking all of the questions that you would need to answer yourself along the way if you were to build this out by hand:
- Can the start and end date be the same?
- Are partial selections valid?
- Should users be able to clear the date?
- Should “today” always be a visible option?
- Is manual entry allowed?
- What format is the date stored in?
- Should pasting in dates be allowed?
The list goes on and on. You cannot possibly think of all of these edge cases, but the model can help you identify many of them.
You can make plan mode even more aggressive in the sheer number of questions and edge cases it asks about by installing the “grill-me” skill from Matt Pocock.
/plan /grill-me Build a date picker web component. I want the user to be able to zoom in and out of years, months, and days.This planning step is critical. The point is not for you to just accept every suggestion from the AI. If you do that, you are negating the value of this planning process. The point is for you to deeply engage with the problem and guide the model. This is where your expertise comes into play.
You can also ask the model questions back. In the screenshot below, it asks me about “non-contiguous dates.” I’m pretty sure I know what the model means here, but I’m going to ask for clarification so we’re on the same page.
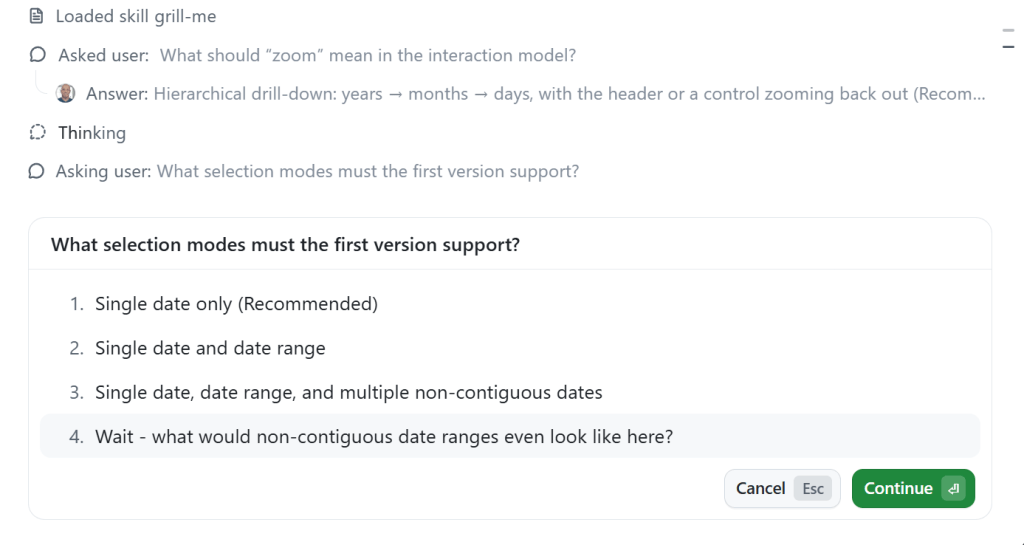
The planning process will keep going even if you interrupt to ask clarifying questions, etc.
5. Implement with Autopilot
Once the plan is finished, GitHub Copilot will likely prompt you to switch to Autopilot and start implementing the plan.
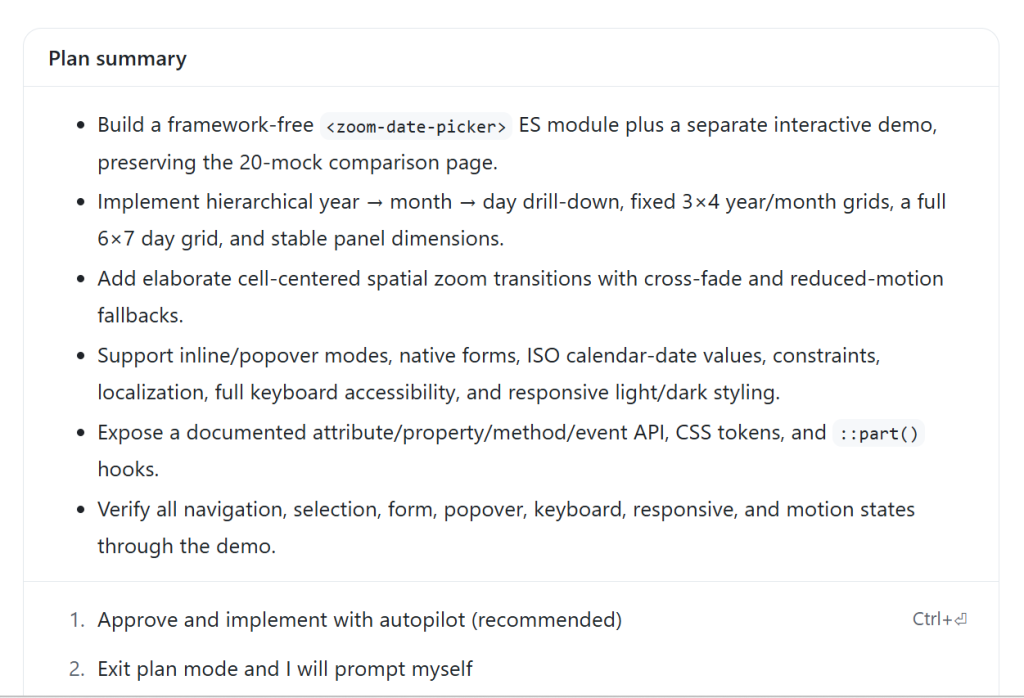
Autopilot is a built-in loop. It forces the model to continue working by ensuring that it has actually done what it said it would do—which in this case is completing every item in the plan.
GitHub Copilot will automatically act as an orchestrator during this phase. If it needs to read files in the codebase, it will use the “Explore” subagent with a small model. If it deems an action relatively complex, it will likely choose the “General Purpose” subagent with a larger model. While you can get fine-grained control over orchestration in GitHub Copilot with custom agents and instructions, you don’t need to do anything special to get the advantages of subagents and multimodel workflows. This works out of the box, even if you did not know that any of these things existed.
6. Human review and iteration
This is where you get your dopamine hit. You get to see what the AI has created.
But it’s likely that you won’t get exactly what you wanted. That’s normal and expected. The model cannot read your mind, and it is error-prone. Iterate with the model until you get what you actually want. Whether that’s just code or an improved UI, this is the part where your taste will decide the quality of the final product.
For instance, here’s the date picker that GitHub Copilot gave me.
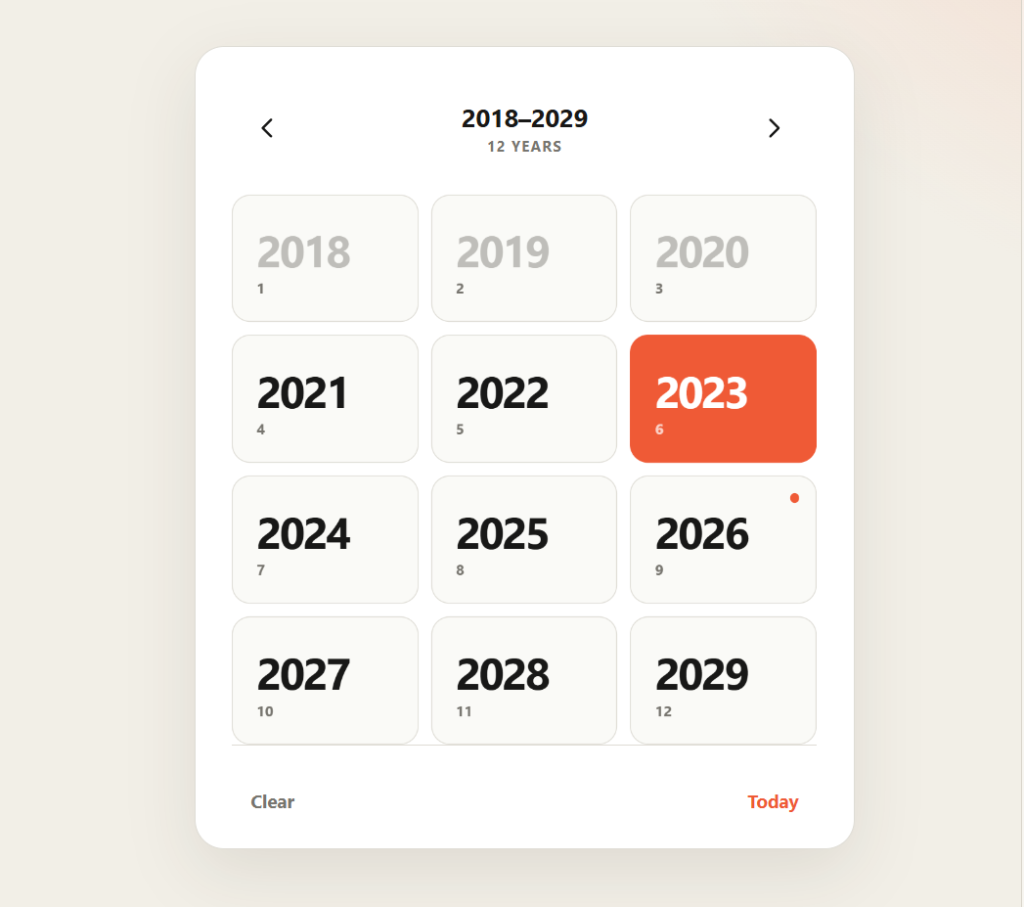
Already I can see it has some issues:
- Animations are inconsistent
- Text is unreadable when hovering over a selected date because of color contrast
- It doesn’t need to say “12 YEARS” at the top.
- When I click “Today”, it doesn’t take me to the day if I’m in the month or year view.
Also, I don’t love the design. It looks a little too much like it was created by AI—because it was!
So here we’re just in follow-up mode. I’m going to use a CSS framework I created called Postrboard. I add it as a skill that just points to the CSS and tells the agent how to use it. You can feel free to install it yourself if you’d like to use it, or you can pick any other CSS framework out there that you like. Giving the model some design guidance is quite helpful, and often a CSS framework is all you need.
ok - we don't need a landing page here - just the component, output and settings panel in a minimal setting. Use the /postboard skill for the design and colors.For the date picker, when I click on the day, it tries to zoom in, but can’t because there is nothing to zoom to. There should be no zoom there.
It doesn’t need to say “Zoom Out” at the top
When I mouse over a month or year that contains the selected day, I cannot read the hover text.
When I click “Today” it should take me to that day view, even if I’m on the month or the year.
The months don’t need numbers under them and they don’t need to be in boxes
Same goes for years. And it doesn’t need to say “12 years” at the top.”
Notice how conversational this is. Don’t overthink it. When you’re fixing a bunch of small things like this, just give it to the model. If you’ve got the context, you’ve got the prompt.
The most important thing is not to settle for AI output that is “good enough.” Insist on quality. Be ruthless about it. That part is still your responsibility, and knowing what a quality result is from something that isn’t is the value that you bring. No AI will ever replace your human touch and creativity.
Here’s what my final date picker looks like. Scroll to the end of this post to see it in action.
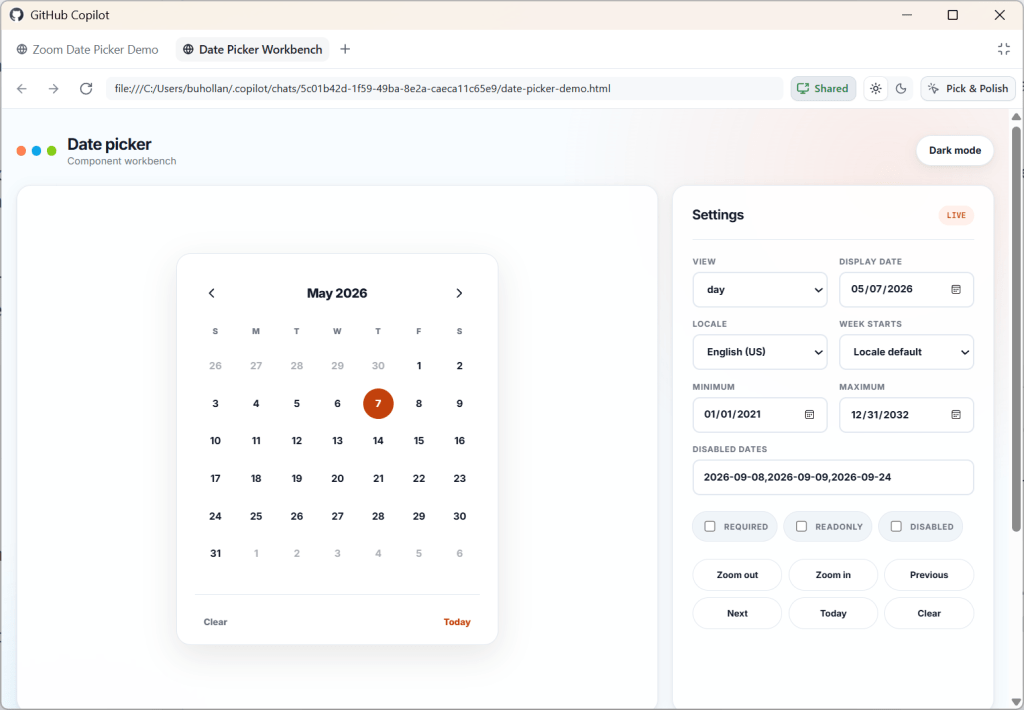
7. Rubber duck the result
After you’ve iterated and are happy with what you’ve created, it’s time to do a final review.
Request a Rubber Duck review from GitHub Copilot. You can do this just by asking for it:
Perform a rubber duck review on this date picker component implementationIn a Rubber Duck review, GitHub Copilot will request a review from a model of a different AI family. For instance, since I was using GPT 5.6 Terra, it requested a review from Sonnet. Different models were trained on different data, so they have different blind spots. A Rubber Duck review helps identify potential issues that might be missed by a single model.
Note that you can use this at any point in this workflow. You can rubber duck prototypes. You can rubber duck plans. It all just depends on if you want a second AI review on something.
And if you want to take this a step further, you can combine rubber duck with Autopilot to get the models to work together in a loop to improve the final result.
“/autopilot rubber duck this date picker implementation. When you have the result, review it carefully and make any necessary adjustments. Repeat the rubber duck review until both you and the reviewing model agree that the only items that remain have diminishing returns.”
After this step, you will have an even more refined result than before and will have likely identified many extra edge cases. This step does cost more tokens, but you are really battle-hardening the code. Think of it as an investment in your future self who won’t have to deal with these issues because you caught them now.
8. Profit
At this point, you’re ready to stage and commit, or move on to the next feature you want to add along with this pull request.
I’d recommend starting a new chat session for anything you do next that doesn’t have to do with this date picker. You can think of chat sessions as being topical; if you start to diverge too much from the main topic, it’s probably time for a new session.
Here’s the final result from my workflow building the date picker for this post.
I realize that this is a bit of a contrived example, but can we all just pause for a moment and marvel at what we’re able to pull off with AI now? Building a date picker used to be one of the hardest things you could try to do. Just ask any of the heroes out there who have built them.
Things don’t have to be complicated
This simple workflow will be enough for most people. The simplicity also helps you multitask. It’s easier to reason about what agent is in what state and what you were doing last when you keep things simple. Your context window is limited too.
There is so much happening in the AI space right now. There is no upper limit on the things that you can build and experiment with. You can add MCP servers, skills, instructions, and custom agents. You can set up workflows and loops, create agents that prompt agents, and stand up entire virtual dev teams.
But keep in mind that nobody really knows what they are doing right now. We’re all figuring this out as we go. A lot of what is today’s magical incantation for AI will be tomorrow’s anti-pattern.
Just focus on getting a repeatable, high-quality result in the simplest way that you can. Learn the harness and you’ll be just fine.
The post The harness is all you need (mostly) appeared first on The GitHub Blog.
What's Your Reaction?
 Like
0
Like
0
 Dislike
0
Dislike
0
 Love
0
Love
0
 Funny
0
Funny
0
 Wow
0
Wow
0
 Sad
0
Sad
0
 Angry
0
Angry
0










Comments (0)